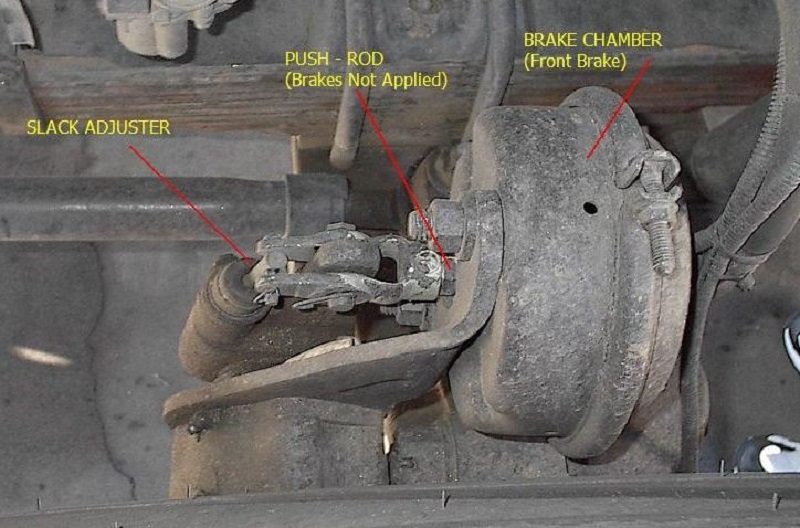
Air brakes in heavy commercial vehicles are an alternative to hydraulic brakes on lighter vehicles. Learning how to adjust air brakes is important for a few reasons. Not only will it save money on the fuel bill, but knowing how to do the adjustment yourself will prevent incurring costly trips to a repair shop. Also, you cannot stop a vehicle safely with a misaligned air brake.
Correctly adjusted brakes mean the pushrod travel of the left axle brake will be similar to the right axle one. Excessive pushrod travel is the warning sign, telling you to adjust air brakes.
To check whether the air brakes are working correctly or not, you can use the applied stroke method:

Air brakes use either a manual or an automatic slack adjuster. Today, we’re going to discuss the adjustment of a manual slack adjuster, which is the most common. Without further ado, let’s find out how to adjust air brakes on trucks and trailers that use a manual slack adjuster:
Your manual slack adjuster will be a flat handle or knob on the side of the brake chamber, usually near the left side. There is a small indicator line (often blue or red) visible next to it, which is used to set your air pressure. Although some manual slack adjusters are equipped with an indicator dial, this isn’t always the case.
To do this, you’ll need to jack up your trailer and support it securely with jack stands. You should also always wear protective eyewear when working with air brakes.
There should be a spring-loaded locking sleeve on the adjuster. Press and hold for turning the adjusting bolt. You have to figure out whether to turn clockwise or counterclockwise to tighten the slack adjustment.
When turning the adjusting bolt with a wrench, watch out for the rotation of the camshaft. If the cam rotates in the same direction it would after applying the brakes, you are turning the bolt in the right direction.
Turning the bolt should not push the pushrod out of the chamber. If it does, you are doing it wrong. So, be sure about the proper turning direction by looking at both camshaft rotation and pushrod trajectory.
Once you are sure, turn the adjusting bolt until reaching the maximum stiffness. Feeling a solid resistance means the brake linings have touched the brake drum.
However, there should be a slight distance between the linings and the drum. Just give the adjusting bolt about 1⁄3 of a turn to the opposite direction to create that desired distance. To keep the bolt fixed to that position, re-engage the locking sleeve to the bolt.
This is how to adjust air brakes. When everything is done, you need to check again the distance between the pushrod’s exit point and the face of the brake chamber.
SEE MORE
After you’ve finished adjusting the manual slack adjuster, carefully lower your truck or trailer by removing your jack stands.
Congratulations! You’ve successfully adjusted the air brakes on your vehicle!
Vehicles that have automatic slack adjusters don’t need any manual alignment fixes. An automatic adjuster stroking beyond the maximum limit points the finger to underlying brake issues.
To catch the problem in time, always diagnose the adjusters by an expert mechanic around every 40,000 to 80,000 km. However, the transport safety laws in the United States and Canada demand to check the brake adjustment before every trip.
If the automatic slack adjuster in your vehicle needs readjustment or there is any braking problem, you should contact an expert mechanic to fix the issue.
This is how to adjust air brakes when the vehicle has manual slack adjusters. Keep an assistant during the examination and adjustment processes because it’s not a one-person job. Take immediate help from an expert if you encounter something unusual.